In Part 1 of this project we covered building the infrastructure that underpins Kubernetes; the Virtual Machines that make up it’s Control and Data Planes, implementing high availability, bootstrapping the core Kubernetes components and considerations for the various networking elements.
All of this is great, but after all of that all our cluster doesn’t actually do very much yet. It’s still in a pretty raw state and not ready to serve out applications in anything but a very basic manner. In this post we’ll look at building out some internal components within a Kubernetes cluster that will be needed for most scenarios.
The full code for this post can be found in GitHub here.

What Do We Want To Cover?
We’re going to deploy some of the most commonly used Kubernetes systems which can be implemented to serve a large amount of applications and provide a framework for serving web applications to the host network. Specifically we’ll be covering:
- How to deploy applications and configure storage
- Exposing running applications to the host network
- Building a PKI and managing certificates
- Deploying an example application which uses these systems
- How this process can be automated
If you didn’t already, you will need to clone the git repo for this project first:
git clone https://github.com/tinfoilcipher/kubernetes-baremetal-lab.git
cd kubernetes-baremetal-lab
If you’re following along, I’m going to assume you have both kubectl, helm and helmfile installed. If not, click the links for installation guides for all three.
Choices For Deploying – Manifests Vs Helm
Kubernetes internal componentry is built up of independent objects, each of which represents an individual component in a wider system. These objects are “described” in a YAML specification and applied to a running cluster via the Kubernetes API, the cluster then does it’s best to get itself in to that state.
Broadly speaking, the contents of your YAML is used to define what applications are and aren’t running on your cluster and how they are configured.
Whilst this is a good system for small deployments, it quickly starts to show it’s limitations at scale. Complex deployments become unwieldy to manage when there is that much YAML flying around. Helm presents us with a solution to this. Acting as a de-facto package manager for Kubernetes, it uses a powerful templating language to template YAML manifests from a set of pre-defined input values.
Public Helm repositories are pretty common these days and packages (Charts) are available for most of the biggest open source packages. In order to make our deployment as painless as possible, we’ll be using Helm as much as possible, but we’ll go a step further and use Helmfile.
Helmfile provides a templating system for deploying multiple charts at the same time, running pre and post installation operations, maintaining multiple environments and a bunch of other cool features.
I’m only going to point out the relevant commands for Helmfile for this post, take a look at the readme for more context.
Creating Namespaces
Namespaces are used by Kubernetes to isolate resources in to logical groups. As we’re going to deploy a few resources here we’ll get some Namespaces set up in advance. The YAML spec below shows an example namespace we’ll be using:
---
kind: Namespace
apiVersion: v1
metadata:
  name: ingress-nginx
  labels:
    name: ingress-nginx
We’ll be creating the following namespaces:
- nfs-provisioner
- metallb-system
- ingress-nginx
- cert-manager
- metrics-server
- kubernetes-dashboard
We can create them all with:
kubectl apply -f kubernetes/namespaces.yaml
# namespace/cert-manager created
# namespace/ingress-nginx created
# namespace/metallb-system created
# namespace/netbox created
# namespace/nfs-provisioner created
Helm Charts often include the option to create namespaces but this isn’t guaranteed, I’d always recommend creating and managing your own.
Persistent Storage Using NFS
Kubernetes is a distributed system and by design it was meant to play host to stateless apps. One of the issues we face here is managing how we’re going to work with storage, specifically how common storage can be accessed no matter what node your application is running on.
When deploying an application; Kubernetes mounts storage based on StorageClass, this defines the type of storage you’re going to use. In cloud environments we can use a native integration with a PaaS Storage StorageClass such as S3, but running on bare metal we’ll need to do something a little more generic. We’re going to be using NFS (I’ll be connecting to an existing server and share). Just having an NFS share being offered still doesn’t get us all the way there however.
Kubernetes applications access storage using PersistantVolumes (PVs), which in the case of NFS will be subdirectories in our root NFS share (we can’t have every application dumping it’s files in one directory after all). A second mechanism called PersistantVolumeClaims (PVCs) represents a request from an application to access a PV.
The arrangement of trying to manually manage all of this will quickly become a nightmare, we really need the provisioning mechanism to be dynamic. To achieve this, we’ll be using nfs-subdir-external-provisioner. This will create our StorageClass and manage the provisioning of PVs based on PVCs.
The below diagram breaks down the functionality at a high level:
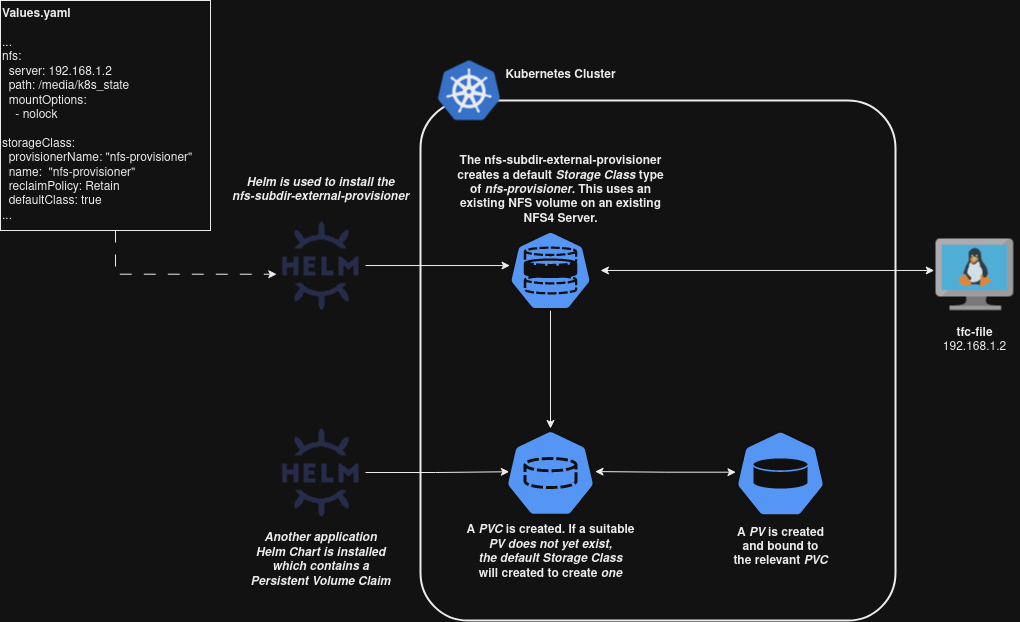
These values shown above and below are defined in here in our helmfile/values.yaml. You will need to update these for your network before running:
# helmfile/values.yaml

...
nfsSubdirProvisioner:
  imageTags:
    provisioner: v4.0.2
  host:
    server: "" #--Host of your NFS Server
    path: "" #--Path of your NFS Mount
  reclaimPolicy: Retain
  isDefault: true
  replicaCount: 2
...
With this updated, we can deploy the NFS Subdir Provisioner:
helmfile -f helmfile/helmfile.yaml --environment default --selector app=nfs-provisioner sync
# ...
# ...
# UPDATED RELEASES:
# NAME      CHART                                                               VERSION
# metallb   nfs-subdir-external-provisioner/nfs-subdir-external-provisioner     4.0.9

kubectl get deployment -n nfs-provisioner
# NAME                              READY   UP-TO-DATE   AVAILABLE   AGE
# nfs-subdir-external-provisioner   2/2     2            2           2m
With that in place, let’s have a look at some of the networking challenges that we still have to tackle.
Exposing Applications – What Are Services Anyway?
Before we get any more muddled with terminology, let’s take a brief aside to discuss what Services are in a Kubernetes context. We’re not going to do an incredibly deep dive because this article is going to be long enough, but let’s get some clarity.
In Part 1, we allowed kubeadm to set up a large subnet (10.96.0.0/12) to provide Services. Services are Kubernetes Objects which, broadly speaking, are used to provide Service Discovery for Pods and forward traffic in one of two ways:
- Exposing pods outside of the cluster, making them accessible to the “outside world”
- Exposing running pods to eachother and making them resolvable by internal DNS
In order to provide this in different ways; services come in 3 flavours:
- ClusterIP: This is the default Service type and is used to expose Pods to other Pods. Despite the name, all lookups are done by internal DNS using the $service.namespace.svc.cluster.local syntax. Using a static IP address for anything in Kubernetes is generally a bad idea and IPs should be considered ephemeral.
- NodePort: This type sets up a 1:1 NAT with the Pod‘s TCP/UDP port and the underlying Node using an Unprivileged Port in the 30000-32767 range. This is used to expose the application outside of the cluster but does not provide any load balancing between nodes. Once traffic reaches a node it is forwarded to the relevant ClusterIP and then the relevant Pod.
- LoadBalancer: A more common means of exposing an application outside of the cluster. This type sets up a loadbalancer on the cloud providers infrastructure and configures it to forward traffic to the relevant Pods. The functionality of the cloud providers loadbalancer is defined in YAML and configured using Annotations. Once traffic passes the LoadBalancer it is sent to the underlying NodePort, then ClusterIP and eventually to the relevant Pod.
For a more comprehensive breakdown, take a look at the Kubernetes docs here.
MetalLB – LoadBalancer Services Without Public Clouds
As our quick outline of Services just showed, we will need to use the LoadBalancer Service to reliably expose applications running in our cluster. This is another one of those things that the cloud vendors do a lot of the heavy lifting for us on and Kubernetes does not implement a bare metal loadbalancer out of the box. We’ll have to come up with another solution.
We could implement our own solution by forwarding an external load balancer to NodePorts, but this sounds like a pain to manage and the LoadBalancer Service type is sitting right there. To solve this problem, we’ll be using the MetalLB project. Which provides the LoadBalancer functionality offered on public clouds on bare metal.
The below diagram shows a high level outline of how this will work:
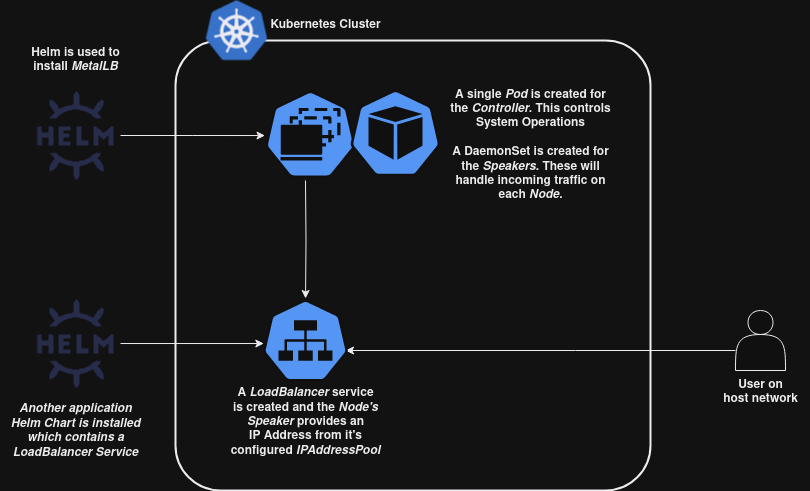
Something to make note of here is that we will be using MetalLB in Layer 2 mode. As the documentation implies this is really only useful for failover between loads and not load distribution, for out purposes it should serve us fine though.
Once we deploy MetalLB, helmfile will automatically define a set of subnets which can be used to serve LoadBalancers by applying a couple of YAML manifests. In Part 1 we reserved this range as 192.168.1.225 – 234 but Kubernetes needs to be informed of the range we intend to use. If you want to use a different range for your network be sure to edit the manifest at helmfile/apps/metallb/manifests/loadbalancer_bootstrap.yaml:
#--helmfile/apps/metallb/manifests/loadbalancer_bootstrap.yaml

apiVersion: metallb.io/v1beta1
kind: IPAddressPool
metadata:
  name: application-services
  namespace: metallb-system
spec:
  addresses:
  - 192.168.1.225-192.168.1.234 #--MAKE YOUR CHANGE HERE
---
apiVersion: metallb.io/v1beta1
kind: L2Advertisement
metadata:
  name: application-services
  namespace: metallb-system
spec:
  ipAddressPools:
  - application-services
These are applied as an IPAddressPool (the pool from which LoadBalancers can take addresses) and a L2Advertisment (which, predictably) is a Layer 2 advertisement for available addresses when a LoadBalancer is requested.
With this understood, let’s deploy MetalLB:
helmfile -f helmfile/helmfile.yaml --environment default --selector app=metallb sync
# ...
# ...
# hook[postsync] logs | ipaddresspool.metallb.io/application-services created
# hook[postsync] logs | l2advertisement.metallb.io/application-services created
# hook[postsync] logs |
#
# UPDATED RELEASES:
# NAME      CHART               VERSION
# metallb   metalb/metalb       4.1.8

kubectl get deployment -n metallb-system
# NAME                 READY   UP-TO-DATE   AVAILABLE   AGE
# metallb-controller   1/1     1            1           5m

kubectl get daemonset -n metallb-system
# NAME              DESIRED   CURRENT   READY   UP-TO-DATE   AVAILABLE   NODE SELECTOR            AGE
# metallb-speaker   3         3         3       3            3           kubernetes.io/os=linux   5m
These are not the only available configurations for MetalLB and the documentation is fairly comprehensive. This will do fine for our needs though.
With our LoadBalancers understood, let’s move on to thinking about HTTP/S traffic specifically.
Ingress – Manging HTTP/S with ingress-nginx-controller
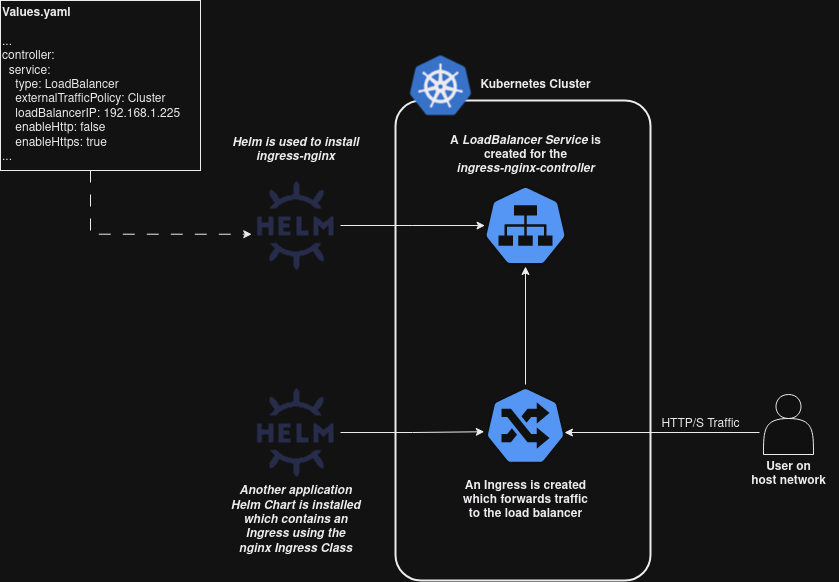
Ingress is the Kubernetes object used to manage HTTP/S routes in to an application. In order to implement this we will also need a controller to manage our ingresses ingresses, in our case we’ll be using the ingress-nginx-controller.
Don’t let these concepts confuse you if you’ve never encountered them, you can roughly think of the controller as any other reverse proxy deployment you might have seen (like NGINX or Apache) and the ingresses as HTTP/S routes in sites-available.
The controller must still be attached to a LoadBalancer Service in order to expose it outside the cluster, the benefit of this arrangement is that multiple sites can be exposed on the same LoadBalancer and routed based on their domain names. The below diagram shows an example of how this looks and will work in our infrastructure:
With that understood, let’s deploy:
helmfile -f helmfile/helmfile.yaml --environment default --selector app=ingress-nginx sync
# ...
# ...
# UPDATED RELEASES:
# NAME              CHART                               VERSION
# ingress-nginx     ingress-nginx/ingress-nginx         4.3.0

kubectl get deployment -n ingress-nginx
# NAME                       READY   UP-TO-DATE   AVAILABLE   AGE
# ingress-nginx-controller   1/1     1            1           3m
So at this point, we have the networking under control and we can serve out web applications over HTTP, but that’s not great for the 21st century. As if things weren’t complicated enough we’ll need to bring certificates in to the mix to work with HTTPS.
Implementing PKI with Cert-Manager
Unlike the other 99% of people, I’m a big fan of working with certificates. I’ll be the first to admit that it’s usually a pretty painful process though. Jetstack’s cert-manager offers a very pain free solution to PKI for Kubernetes and makes what used to be a pretty agonising and often very manual process very efficient and highly automated.
Just because it’s automated though doesn’t mean the process is any less important to understand. There’s a lot of moving parts in the way we’re going to deploy which is going to mean bootstrapping a Certificate Authority that our applications can make use of.
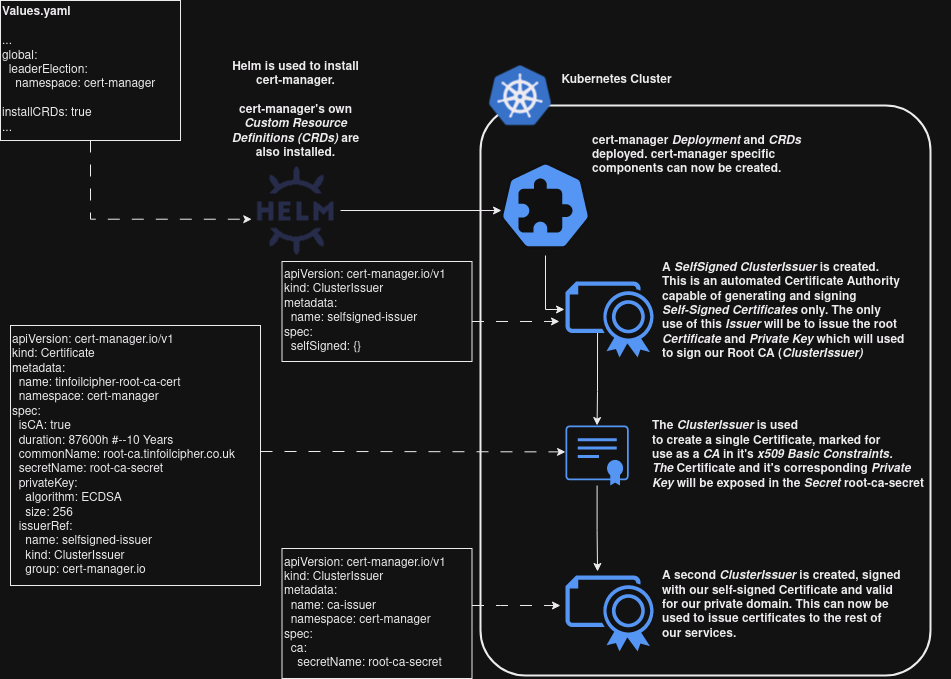
This deployment roughly this has 4 steps:
- cert-manager is deployed using the official helm chart using the values defined here
- An ClusterIssuer is created (the cert-manager object responsible for issuing cluster-wide certificates
- A self-signed certificate is requested from the ClusterIssuer which will act as our Root CA cert
- A new ClusterIssuer is created, using the newly created certificate
At a high level this process looks like:
With this understood, we can deploy the PKI with:
helmfile -f helmfile/helmfile.yaml --environment default --selector app=cert-manager sync
# ...
# ...
# UPDATED RELEASES:
# NAME              CHART                           VERSION
# ingress-nginx     jetstack/cert-manager           4.3.0

kubectl get deployment -n cert-manager
# NAME                      READY   UP-TO-DATE   AVAILABLE   AGE
# cert-manager              1/1     1            1           21m
# cert-manager-cainjector   1/1     1            1           21m
# cert-manager-webhook      1/1     1            1           22m
Future applications will be able to use HTTPs or leverage any other services which need TLS from this point.
Example Application – Netbox with PostgresDB
I’ve talked about Netbox a lot in the past and I’m using it as an example here as it will let us demonstrate a few things:
- MetalLB and ingress-nginx will be working in tandem to expose the application over the Ingress Controller Loadbalancer
- cert-manager will be issuing a valid certificate to our Ingress
- nfs-subdir-external-provisioner will configure underlying storage PersistentVolumes and PersistentVolumeClaims for the applications Postgres database and static assets
With the relevant infrastructure in place, our deployment will do something along these lines:
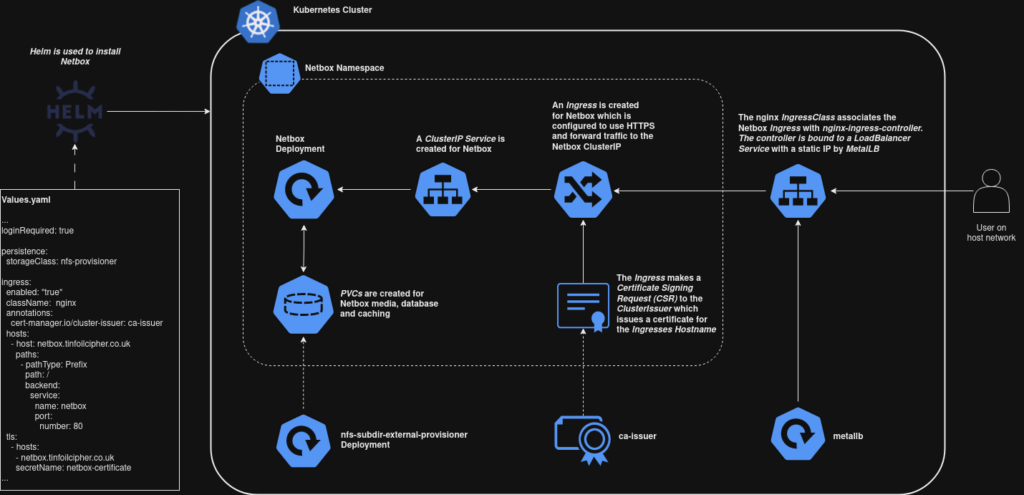
Deployment should now make use of these components if we run:
export NETBOX_DB_ADMIN_PASSWORD=StrongPassword123!
export NETBOX_DB_ROOT_PASSWORD=VeryStrongPassword123!
export NETBOX_ADMIN_PASSWORD=JustAsStrongPassword123!

helmfile -f helmfile/helmfile.yaml --environment default --selector app=netbox sync
Deploying Everything – Further Automation with Helmfile
Throughout we’ve deployed by running helmfile and selecting specific applications with the –selector argument to choose specific labels. If we remove this then all sub-helmfiles listed in helmfile/helmfile.yaml will be processed in the order they are provided:
#--Set these to something actually secure
export NETBOX_DB_ADMIN_PASSWORD=StrongPassword123!
export NETBOX_DB_ROOT_PASSWORD=VeryStrongPassword123!
export NETBOX_ADMIN_PASSWORD=JustAsStrongPassword123!

helmfile -f helmfile/helmfile.yaml --environment default sync
That will let out a wall of text and build all of the infrastructure we’ve discussed in the order we’ve discussed. This could have been done straight out of the gate but that misses the point a bit of trying to understand how a system works.
Conclusion
Well! That was a lot, but hopefully it all made sense.
For anyone that made it this far, now we have a framework to which any future apps can theoretically be deployed. I’ve been running all of my home systems on a cluster like this for several months now and haven’t had any real issues. In some future posts we’ll take a look at leveraging the PKI further, and some unique application deployments.