Crossplane - Infrastructure as Code for Kubernetes Platform Teams
UPDATE 08/10/2025: If you are reading this article and nothing seems to work anymore. It was written for Crossplane 1.9. I have written a newer guide for Crossplane v2.0 here .
It’s no secret that I love Terraform but it’s not without it’s drawbacks and when operating a platform built around Kubernetes it can be a tall order to introduce and migrate to. In this post I’m going to look at a less well known Infrastructure as Code solution; Crossplane. Whilst it’s creators don’t bill it as an IaC solution it certainly offers the same functionality in a very different way so let’s take a look.
The sample code for this article can be found here.

Control Planes, Control Planes Everywhere!
Control Planes are the hot new thing but what is everyone talking about, exactly?
If you go to the Crossplane Website you would be forgiven for not exactly understanding what this product does. Let’s take a glance at the pitch:
Build control planes without needing to write code. Crossplane has a highly extensible backend that enables you to orchestrate applications and infrastructure no matter where they run, and a highly configurable frontend that lets you define the declarative API it offers
That sounds impressive, very technical…but what does it mean exactly?
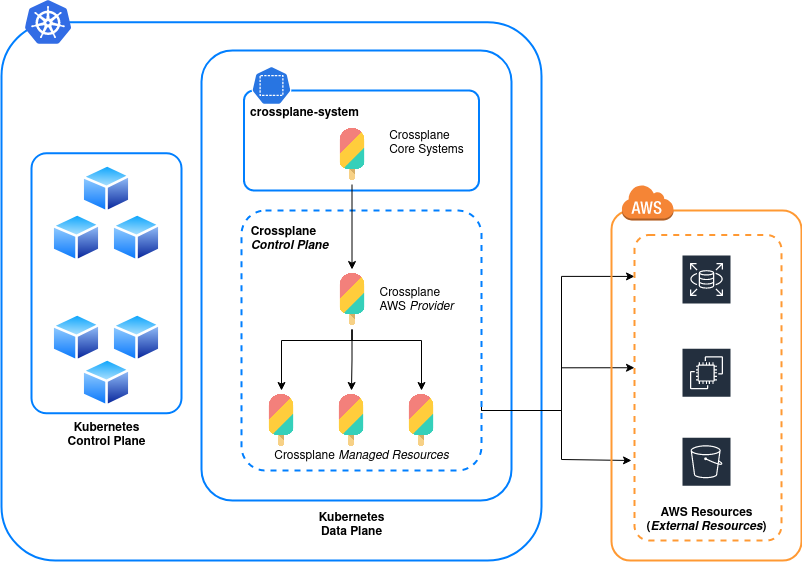
As experienced sysadmins will be able to tell you; the term Control Plane originated in physical network routing and switching, the Control Plane being the part of the network architecture that determines where inbound packets should be forwarded. In contrast, the network’s Data Plane carries out that forwarding.
The idea of a Control Plane was hijacked a few years ago by cloud software engineers, coming to prominence with Kubernetes, to describe part of the software that performs administrative tasks and orchestrates the actions of the Data Plane (usually via a central API). In this architecture, the Data Plane handles the execution of workloads.
Crossplane creates additional Control Planes inside Kubernetes which act as the orchestration layer for resources in your cloud systems. Roughly speaking this turns our Kubernetes cluster in to the provisioning system. The definition how exactly the Control Plane is shaped, much like a Kubernetes cluster in general, is down to your own design. We may want a cluster that is dedicated to creating all cloud resources, a specific type of cloud resource or one which both creates cloud resources and runs application workloads.
Put in simpler terms, Crossplane manages the lifecycle of your cloud resources via a Kubernetes cluster using the same kind of YAML manifests that we’re used to for the rest of Kubernetes.
A final thing to be aware of; Kubernetes already operates it’s own Control Plane (known as the Master Nodes in old lingo) but don’t get this mixed up if you’re trying to do your own reading. Crossplane, along with anything it manages will be executed on the Kubernetes Data Plane the same as any other workload.
That’s a lot to process so let’s try and draw it out:
Installing Crossplane
Installing the Crossplane core system on a Kubernetes cluster is pretty painless
#--Add crossplane-system namespace
kubectl create namespace crossplane-system

#--Add Crossplane Stable Helm Repository
helm repo add crossplane-stable https://charts.crossplane.io/stable
helm repo update

#--Install Crossplane
helm install crossplane -n crossplane-system crossplane-stable/crossplane
Verify Installation
kubectl get all -n crossplane-system
# NAME                                       READY   STATUS    RESTARTS   AGE
# crossplane-575824b4d5-g7wgv                1/1     Running   0          94m
# crossplane-rbac-manager-749b9b7947-hmbld   1/1     Running   0          94m
#
# deployment.apps/crossplane                1/1     1            1           94m
# deployment.apps/crossplane-rbac-manager   1/1     1            1           94m
#
# NAME                                                 DESIRED   CURRENT   READY   AGE
# replicaset.apps/crossplane-575844b1d5                1         1         1       94m
# replicaset.apps/crossplane-rbac-manager-742c9b7947   1         1         1       94m
All stable, we’re ready to integrate with a Cloud Provider.
Integrating With a Provider, Securely
Crossplane uses the concept of Providers_ to create and manage remote resources on cloud systems. A Provider is a package (very niftily distributed as an image) containing CRDs and Controllers for Crossplane Resources which allow the interaction with a cloud service’s API. For this example we’ll be integrating with the AWS Provider but they’re all fairly painless to configure.
The Crossplane documentation provides a method for using a static IAM Access Key and Secret Access Key but this practice is usually frowned upon (and is a pain to cycle secrets for) so in this example we’ll be looking at configuring the Provider with an IAM Role (be aware that this is only easily feasible is you’re using EKS, if you’re using anything else you’ll need to use a static credential or cook up another authentication method).
I’m going to assume a properly configured IAM Role already exists to create AWS VPC resources named tinfoil-crossplane-role, use your own role name as you see fit. The AWS documentation for creating such a role is right here.
We’ll use the below manifest to create two core Crossplane Objects, a ControllerConfig and Provider. These will download our AWS Provider image and integrate it with the appropriate Role.
#--provider.yaml

apiVersion: pkg.crossplane.io/v1alpha1
kind: ControllerConfig
metadata:
  name: aws-config
  annotations:
    eks.amazonaws.com/role-arn: arn:aws:iam::0123456789012:role/tinfoil-crossplane-role #--Define your IAM Role
spec:
  podSecurityContext:
    fsGroup: 2000
---
apiVersion: pkg.crossplane.io/v1
kind: Provider
metadata:
  name: provider-aws
spec:
  package: crossplane/provider-aws:v0.31.0
  controllerConfigRef:
    name: aws-config
Apply these manifests with:
kubectl apply -f provider.yaml

# controllerconfig.pkg.crossplane.io/aws-config created
# provider.pkg.crossplane.io/provider-aws created
The provider will take a minute or so to download install our CRDs, we can validate that the ProviderConfig API resource is available with:
kubectl api-resources | grep ProviderConfig

# ...
# providerconfigs                     aws.crossplane.io/v1beta1                 ProviderConfig
# providerconfigusages                aws.crossplane.io/v1beta1                 ProviderConfigUsage
# identityproviderconfigs             eks.aws.crossplane.io/v1alpha1            IdentityProviderConfig
# ...
Any less than all 3 results and we have an issue. Assuming they’re all there we can finish up the deployment by applying the below manifest to create our ProviderConfig. This final configuration ensures that the Provider uses the InjectedIdentify method to authenticate with AWS, this is needed to use an IAM Role:
#--provider_config.yaml

apiVersion: aws.crossplane.io/v1beta1
kind: ProviderConfig
metadata:
  name: crossplane-provider-config
spec:
  credentials:
    source: InjectedIdentity
Apply this manifest with:
kubectl apply -f provider_config.yaml

# providerconfig.aws.crossplane.io/crossplane-provider-config created
We’re now securely integrated with AWS.
Provisioning Some Resources
Now we should be able to make some resources so let’s apply the below manifest to create some VPC resources using our new Provider:
#--resource_config.yaml

apiVersion: ec2.aws.crossplane.io/v1beta1
kind: VPC
metadata:
  name: tinfoil-vpc
spec:
  forProvider:
    region: eu-west-1
    cidrBlock: 10.0.0.0/16
    enableDnsSupport: true
    enableDnsHostNames: true
    instanceTenancy: default
  providerConfigRef:
    name: crossplane-provider-config
---
apiVersion: ec2.aws.crossplane.io/v1beta1
kind: Subnet
metadata:
  name: tinfoil-subnet-a
spec:
  forProvider:
    cidrBlock: 10.0.10.0/24
    vpcIdRef:
      name: tinfoil-vpc
    availabilityZone: eu-west-1a
  providerRef:
    name: provider-aws
---
apiVersion: ec2.aws.crossplane.io/v1beta1
kind: Subnet
metadata:
  name: tinfoil-subnet-b
spec:
  forProvider:
    cidrBlock: 10.0.20.0/24
    vpcIdRef:
      name: tinfoil-vpc
    availabilityZone: eu-west-1b
  providerRef:
    name: provider-aws
---
apiVersion: ec2.aws.crossplane.io/v1beta1
kind: Subnet
metadata:
  name: tinfoil-subnet-c
spec:
  forProvider:
    cidrBlock: 10.0.30.0/24
    vpcIdRef:
      name: tinfoil-vpc
    availabilityZone: eu-west-1c
  providerRef:
    name: provider-aws
A note to be aware of in the above manifest is that the Subnet objects vpcIDRef Key object allows us to reference a VPC Resource, meaning we can declare it before knowing it’s value.
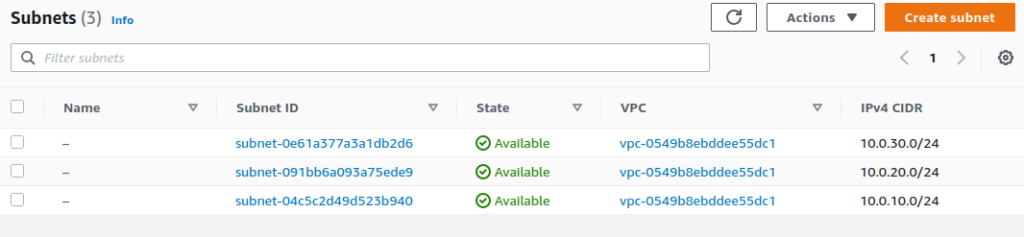
Applying this should create us a VPC and several subnets:
kubectl apply -f resource_config.yaml

# vpc.ec2.aws.crossplane.io/tinfoil-vpc created
# subnet.ec2.aws.crossplane.io/tinfoil-subnet-a created
# subnet.ec2.aws.crossplane.io/tinfoil-subnet-b created
# subnet.ec2.aws.crossplane.io/tinfoil-subnet-c created

kubectl get vpc

# NAME          READY   SYNCED   ID                      CIDR          IPV6CIDR   AGE
# tinfoil-vpc   True    True     vpc-0549b8ebddee55dc1   10.0.0.0/16              6m37s

kubectl get subnets

# NAME               READY   SYNCED   ID                         VPC                     CIDR           AGE
# tinfoil-subnet-a   True    True     subnet-04c5c2d49d523b940   vpc-0549b8ebddee55dc1   10.0.10.0/24   6m42s
# tinfoil-subnet-b   True    True     subnet-091bb6a093a75ede9   vpc-0549b8ebddee55dc1   10.0.20.0/24   6m42s
# tinfoil-subnet-c   True    True     subnet-0e61a377a3a1db2d6   vpc-0549b8ebddee55dc1   10.0.30.0/24   6m42s
The Ready status indicates that the Resources have been provisioned and the Synced status indicates that there is no state drift.
Checking with the web console we can see that our resources have indeed been created:

This is all still pretty manual, though it does give us a good idea of where we can go next once we start bringing some YAML templating in to the mix and leveraging the more powerful parts of Crossplane.
There is of course extensive documentation for the API which so far appears to be mostly accurate, if inconsistent, but it is much less friendly to use than the alternatives.
Doesn’t Terraform Already Do This?
Well, yes, but Terraform isn’t a silver bullet for every team. If the users of your platform are largely development teams with no exposure to Terraform it might not be an attractive proposition to try and get them all to adopt a new tool with a new declarative language, the same is true of your platform engineers.
By comparison, Crossplane is configured with the usual Kubernetes YAML manifests and as such can comfortably have it’s resources templated for use in to any Helm Charts or other YAML parser you are already using to manage your platform.
The real power lies in the Composite Resources functionality, which allows for the creation of several, templated Composed Resources and the ability to define the API specification for provisioning. We’ll take a look at that in future posts, as well as multi-tenancy configurations and just how well state drift is handled.
Crossplane offers some very attractive functionality for platform teams and the scalability options seem huge, the adoption however will probably fall to just how much your system needs to scale and which tools work for your team.