Ansible and JUNOS - Managing Juniper Devices with SSH and NETCONF
I’m a long time fan of Juniper networking devices, there seems to be a snobbery against them for reasons I’ve never understood. Imagine my disappointment to find that this was reflected somewhat in the Ansible documentation where JUNOS seems to be the black sheep and the guides are a little patchy.
Recently I’ve been having some fun integrating Ansible with JUNOS and this post is going to look at both how to configure JUNOS to allow connections from Ansible and then the little gotchas that are needed to configure Ansible itself.

A Quick Overview
Ansible manages network devices using two connection methods which we do not usually see when working with servers and cloud systems, these are network_cli and netconf. The former of these; network_cli is the more familiar option which establishes an SSH connection to a network device, however it’s function is very limited and really all we use it for is to ensure the NETCONF service is enabled on our remote devices.
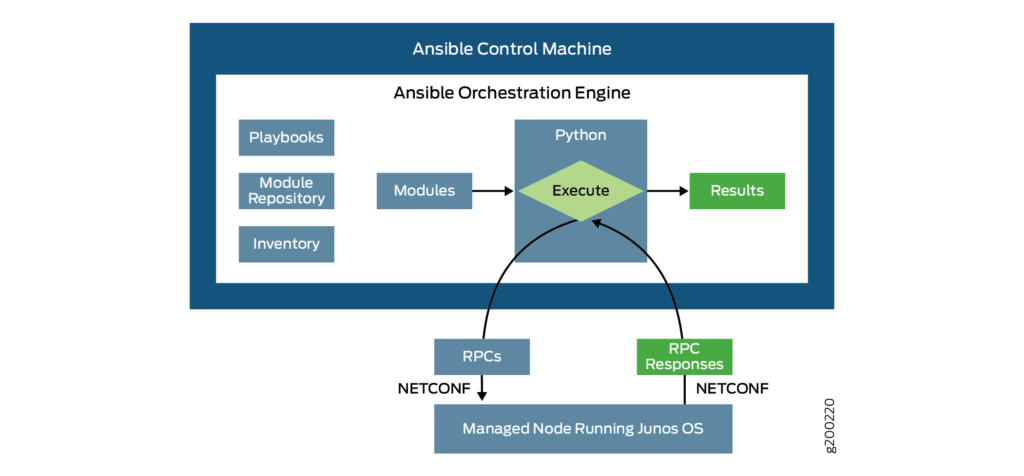
In a nutshell, NETCONF allows for the transport of XML over RPC in order to manage the configuration of network devices. XML isn’t exactly anyone’s favourite way to handle data but Ansible lets us simplify this process by inputting our values as YAML, establishing a local connection to the controller and sending the RPC calls for us using an SSH subsystem.
An excellent breakdown of the execution process from the Juniper documentation is shown below:
Preparing JUNOS For Use With Ansible
First of all we’ll want to get JUNOS configured properly to allow our Ansible Controller to make a secure connection. The first thing we’ll want of course is a Service Account on the JUNOS device and Public Key Authentication configured.
What we’re working with:
- An Ansible Controller named mc-mgmt.
- A Service Account on the Controller named svc_ansible with an existing SSH key-pair.
- A Juniper SRX Device named mcfw.madcaplaughs.co.uk, with SSH enabled on it’s trust Zone and the trust Zone bound to physical interface ge-0/0/1.
- Our SRX device is using local authentication and accounts, with no external authentication or authorisation mechanisms.
To configure our Service Account
#--Transfer Public Key from Ansible Controller to JUNOS Device
svc_ansible@mc-mgmt:~ $ scp .ssh/id_rsa.pub welsh@mcfw.madcaplaughs.co.uk:/tmp
welsh@mcfw.madcaplaughs.co.uks password: *********************************************
# id_rsa.pub        100%  401    86.6KB/s   00:00

#--Connect to the JUNOS Device via SSH
svc_ansible@mc-mgmt:~ $ ssh welsh@mcfw.madcaplaughs.co.uk
welsh@mcfw.madcaplaughs.co.uks password: *********************************************

#--Enter JUNOS Shell
welsh@mcfw> start shell
%
Now that we’re in the shell, it’s worth running a quick cat /etc/passwd and looking at the uids of your users currently on the device. We’re going to need to a set a UID on the next account that we create and we don’t want to set two the same. In our example we’re going to use UID 3000 but your usage may differ! Anyway, that’s all we really need to do on the shell.
#--Exit JUNOS Shell
% exit

#-- Create and configure Service Account
welsh@mcfw> configure
# Entering configuration mode
welsh@mcfw# set system login user svc_ansible authentication load-key-file /tmp/id_rsa.pub
welsh@mcfw# set system login user svc_ansible class super-user
welsh@mcfw# set system login user svc_ansible uid 3000

#--Commit Changes and disconect from JUNOS device
welsh@mcfw# commit
# commit complete
welsh@mcfw# exit
# Exiting configuration mode
welsh@mcfw> exit

#--Test Connection
svc_ansible@mc-mgmt:~ $ ssh svc_ansible@mcfw.madcaplaughs.co.uk
svc_ansible@mcfw>
As we see, our Service Account now authenticates using Public Key Authentication, without a password.
Ensuring The NETCONF Server Is Accessible On JUNOS
Whilst we’re on the JUNOS device, we’ll also need to make sure that the NETCONF service is accessible via the Interface associated with our trust Zone.
#--Allow NETCONF Service on trust Zone interface (ge-0/0/)
svc_ansible@mcfw> configure
# Entering configuration mode
svc_ansible@mcfw# set security zones security-zone trust interfaces ge-0/0/1 host-inbound-traffic system-services netconf
svc_ansible@mcfw# commit
# commit complete
svc_ansible@mcfw# exit
# Exiting configuration mode
svc_ansible@mcfw> exit

#--Test that NETCONF Server is available, -p specificies TCP port and -s specificies to use the SSH subsystem
svc_ansible@mc-mgmt:~ $ ssh svc_ansible@mcfw.madcaplaughs.co.uk -p 830 -s netconf
# <!-- No zombies were killed during the creation of this user interface -->
# <!-- user svc_ansible, class j-super-user -->
# <hello>
#   <capabilities>
#     <capability>urn:ietf:params:xml:ns:netconf:base:1.0</capability>
#     <capability>urn:ietf:params:xml:ns:netconf:capability:candidate:1.0</capability>
#     <capability>urn:ietf:params:xml:ns:netconf:capability:confirmed-commit:1.0</capability>
#     <capability>urn:ietf:params:xml:ns:netconf:capability:validate:1.0</capability>
#     <capability>urn:ietf:params:xml:ns:netconf:capability:url:1.0?protocol=http,ftp,file</capability>
#     <capability>http://xml.juniper.net/netconf/junos/1.0</capability>
#     <capability>http://xml.juniper.net/dmi/system/1.0</capability>
#   </capabilities>
#   <session-id>59756</session-id>
# </hello>
As we can see, we’re getting a good connection and returning a test XML payload (with maybe the world’s best heading).
Configuring The Ansible Controller
Before we use Ansible we’ll need to install a Collection to give us access to some both the Ansible Modules and a new ansible_network_os methods for managing JUNOS.
A couple of options exist and the Juniper Documentation gives a good breakdown of their differences and available support. I favour the junipernetworks.junos Collection which is supported and maintained by Ansible. To install this from Ansible Galaxy we can run:
svc_ansible@mc-mgmt:~ $ ansible-galaxy collection install junipernetworks.junos
# Starting galaxy collection install process
# Process install dependency map
# Starting collection install process
# junipernetworks.junos (2.4.0) was installed successfully
# Skipping 'ansible.netcommon' as it is already installed
# Skipping 'ansible.utils' as it is already installed
Next, let’s install a couple of essential Python libraries, I’m going to use Python 3 (though if you’re forced in to using Python 2 for legacy reasons you can rest assured that both the Collection and these libraries are still supported):
#--Python 3
pip3 install ncclient
pip3 install jxmlease

#--Python 2
pip install ncclient
pip install jxmlease
The ncclient library is used to establish NETCONF connections, whilst the jxmlease library allows for the parsing and transformation of XML (this library is incidentally not mentioned in the setup guide though it is mentioned in the individual module documents, you won’t get very far without it though as you can’t use NETCONF and Ansible without the ability to weave XML and a lot of people seem to get really stuck here as very messy XML errors will be thrown inside JSON errors).
Now, let’s set up an Inventory with some essential configuration. We’ll name this file inventory.ini:
[junos_devices]
mcfw.madcaplaughs.co.uk

[junos_devices:vars]
ansible_user=svc_ansible
remote_user=svc_ansible
ansible_netconf_username=svc_ansible
ansible_netconf_password=Sup3S3cr3Pa55
ansible_network_os=junipernetworks.junos.junos
The two “ansible_netconf” variables above are essential to establish a connection and are interestingly absent from the majority of the Ansible Documentation, it’s possible that I’ve encountered a bug but I suspect this could be an oversight in the docs.
In a real deployment, the password should not go in the inventory! This is just an illustrative example, a better solution here is to use Ansible Vault as we’ve looked at previously.
Ensuring NETCONF Remains Active On The JUNOS Device
Now that we’re set up we can start using Ansible, we want to make sure that as much as possible is configured idempotenly and that should include even the configuration of NETCONF itself.
Luckily, the Ansible docs provide us with a very cool ready-baked Play to enable NETCONF on JUNOS:
#--netconf_enable_example.yaml

---
- name: Firewall - Ensure NETCONF
  hosts: junos_devices
  connection: ansible.netcommon.network_cli #--This connection method needs to be explicitly defined
  gather_facts: false #--Fact gathering must be explicitly disabled, attempting to gather facts will fail
  tasks:

  - name: Enable - JUNOS NETCONF
    junipernetworks.junos.junos_netconf:
...
Running this will ensure that the other required configurations for NETCONF remain enabled:
svc_ansible@mc-mgmt:~ $ ansible-playbook -i inventory.ini netconf_enable_example.yaml

# PLAY [Firewall - Ensure NETCONF] ***********************************************
#
# TASK [Enable - JUNOS NETCONF] **************************************************
# ok: [mcfw.madcaplaughs.co.uk]
#
# PLAY RECAP *********************************************************************
# mcfw.madcaplaughs.co.uk   : ok=1    changed=0    unreachable=0    failed=0    skipped=0    rescued=0    ignored=0
With this in place, we should finally be able to execute tasks using a NETCONF example, which we’ll see with a simple Play to fetch some facts from JUNOS:
#--netconf_facts_example.yaml

---
- name: Firewalls - NETCONF Configurations
  hosts: junos_devices
  connection: ansible.netcommon.netconf
  gather_facts: false #--Must be explicitly disabled, attempting to gather facts via this method will fail
  tasks:

  - name: Firewalls - Collect Firewall Facts
    junipernetworks.junos.junos_facts:
      gather_subset: config
    register: junos_facts

  - name: Firewall - Output Firewall Hostname
    debug:
      var: junos_facts.ansible_facts.ansible_net_hostname
...
Finally, we can see that the Play executes, and the return data is parsed in to JSON:
# PLAY [Firewalls - NETCONF Configurations] **************************************
#
# TASK [Firewalls - Collect Firewall Facts] **************************************
# ok: [mcfw.madcaplaughs.co.uk]
#
# TASK [Firewall - Output Firewall Hostname] *************************************
# ok: [mcfw.madcaplaughs.co.uk] => {
#     "junos_facts.ansible_facts.ansible_net_hostname": "mcfw"
# }
#
# PLAY RECAP *********************************************************************
# mcfw.madcaplaughs.co.uk   : ok=2    changed=0    unreachable=0    failed=0    skipped=0    rescued=0    ignored=0
Not too painful, but it could be clearer!