Deploying to Google Kubernetes Engine Using Helm
In the last post we looked at how to automate the creation of GKE Kubernetes clusters in GCP, however the deployment of workloads to these clusters was still something of a manual process. Enter Helm; the a package manager for Kubernetes.
If this is your first time hearing those words it can be pretty confusing, typically when we think of package management we think of application packages or application dependencies being installed. Helm’s “packages” on the other hand are called Charts. Simply put, these are zipped up bundles of templated Kubernetes manifests (the declarative YAML files used for the various Kubernetes components) which are applied. The templating engine provided by Helm is powerful and allows for the generation of complex and flexible configurations from opinionated input variables.
If you’ve never encountered Helm before, I recommend the IBM Cloud video here as part of their Kubernetes Essentials videos to get a high level overview (they don’t go in to too much technical detail but it gives a good enough overview).

Preamble
From the previous article, we have our Kubernetes Cluster in place, we’ll be deploying to and from the following:
-
Our Cluster in question is going to be tinfoilcluster01 running on Google Kubernetes Engine (GKE), under project tinfoilproject within zone europe-west2-a
-
A GCP Service Account has been created named k8s-cluster-admin which has been granted the Kubernetes Engine Admin permission and a Service Account Key File has been exported
Installing and Authenticating gcloud SDK
On our deployment machine, first we’ll need to install the gcloud CLI tools. We’re using Ubuntu but the application is supported on other Linuxes, Windows and macOS (see here for other platforms):
# Add gcloud URI to apt sources
echo "deb [signed-by=/usr/share/keyrings/cloud.google.gpg] http://packages.cloud.google.com/apt cloud-sdk main" | sudo tee -a /etc/apt/sources.list.d/google-cloud-sdk.list

# Import GCP Public Key to apt
curl https://packages.cloud.google.com/apt/doc/apt-key.gpg | sudo apt-key --keyring /usr/share/keyrings/cloud.google.gpg add -
# % Total    % Received % Xferd  Average Speed   Time    Time     Time  Current
#                                  Dload  Upload   Total   Spent    Left  Speed
# 100   653  100   653    0     0   2732      0 --:--:-- --:--:-- --:--:-- 2720
# OK

# Update apt-cache and install gcloud sdk
sudo apt-get update
sudo apt-get install google-cloud-sdk
Now that the tools are installed, we can use them to authenticate against our GCP project:
# Authenticate against GCP
gcloud auth activate-service-account --key-file=k8s-cluster-admin.json
# Activated service account credentials for: [k8s-cluster-admin@tinfoilproject.iam.gserviceaccount.com]

# Verify authentication is active
gcloud auth list
                     Credentialed Accounts
ACTIVE  ACCOUNT
*       k8s-cluster-admin@tinfoilproject.iam.gserviceaccount.com
Connect to a GKE Cluster
Now that we have authenticated, we need to make a connection to our GKE Kubernetes Cluster, with a view to eventually making this process as automated as possible in a pipeline, let’s work with variables:
# Connect to GKE Cluster
export CLUSTER=tinfoilcluster01
export ZONE=europe-west2-a
export PROJECT=tinfoilproject

gcloud container clusters get-credentials $CLUSTER --zone $ZONE --project $PROJECT

# Verify Cluster Connection
gcloud container clusters list --project $PROJECT

# NAME              LOCATION        MASTER_VERSION  MASTER_IP      MACHINE_TYPE   NODE_VERSION    NUM_NODES  STATUS
# tinfoilcluster01  europe-west2-a  1.14.10-gke.36  35.234.145.34  n1-standard-1  1.14.10-gke.36  3          RUNNING
Install and Configure Helm
Now that we’re authenticated, our machine can speak to GCP and GKE, however we still need to get Helm installed so it can push content to our Cluster. We’re going to work with the latest version of Helm (3.2.1 at the time of writing, but older versions are available here should you need them, we’re also using the 64-bit Linux binary, other platform releases are available for this releases here):
# Download Helm release
wget https://get.helm.sh/helm-v3.2.1-linux-amd64.tar.gz
# helm-v3.2.1-linux-amd64.tar.gz        100%[========================================================================>]  12.33M  2.16MB/s    in 5.7s
# 2020-05-20 12:49:23 (2.15 MB/s) - ‘helm-v3.2.1-linux-amd64.tar.gz’ saved [12927632/12927632]

# Decompress Archive
tar -zxvf helm-v3.2.1-linux-amd64.tar.gz

# Move Helm Binary to Executable Location
sudo mv linux-amd64/helm /usr/local/bin/helm

# Cleanup Junk Files
rm -rf helm-v3.2.1-linux-amd64.tar.gz linux-amd64/

# Verify installation
helm version
# version.BuildInfo{Version:"v3.2.1", GitCommit:"fe51cd1e31e6a202cba7dead9552a6d418ded79a", GitTreeState:"clean", GoVersion:"go1.13.10"}
So we aren’t going to dive in to writing custom Charts or setting up a private repository, we’ll cover those topics in later posts. For now we’re just going to look at using some pre-written Charts from the Bitnami repo to get a loose idea of deployment:
# Add a helm chart repo
helm repo add bitnami https://charts.bitnami.com/bitnami

# Search "stable" repo for packages
helm search repo bitnami
# NAME                                 	CHART VERSION	APP VERSION     DESCRIPTION
# bitnami/airflow                       14.0.8       	2.5.1        	Apache Airflow is a tool to express and...
# bitnami/apache                        9.2.11       	2.4.55       	Apache HTTP Server is an open-source HT...
# bitnami/appsmith                      0.1.9        	1.9.2        	Appsmith is an open source platform for...
# bitnami/argo-cd                       4.4.2        	2.5.7        	Argo CD is a continuous delivery tool f...
# ....
Deploying Services and Ingress
This list goes on with dozens of Charts already available, posting them all here isn’t very valuable, but you get the idea, now we can chose any one of these, or several and have them installed in to our Cluster so let’s install a phpmyadmin and nginx-ingress-controller Chart:
# Update repo to ensure we have the latest versions
helm repo update

# Install charts
helm install bitnami/phpmyadmin --generate-name
helm install bitnami/nginx-ingress-controller --generate-name
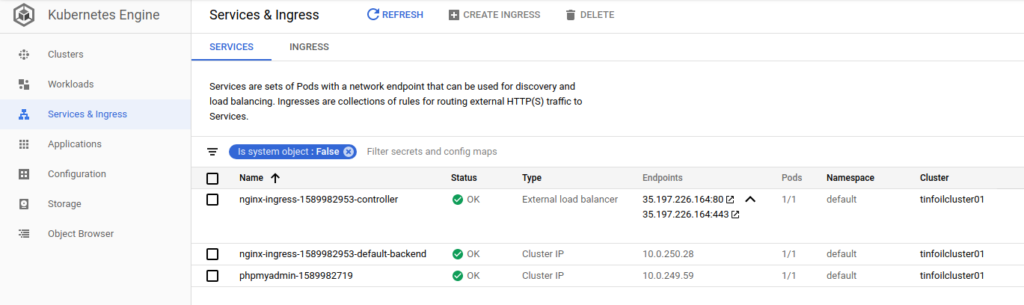
Using the --generate-name argument generates a random name, this ensures that we don’t get duplication of Service names in our Cluster. If we look at our Cluster tinfoilcluster01 now, we can see that our Services have been created:
This is only an example of course, production configurations should really be achieved by creating your own Charts and tailoring/templating them to your requirements.
As this is just an example, we’ll remove these Services with one more command, which is helm uninstall, we’ll need to use the unique names of the Services:
# Uninstall Charts. Note that nginx-ingress has two components, both are
# removed as part of a single chart
helm uninstall phpmyadmin-1589982719 nginx-ingress-1589982953
Once executed, our Services are removed from the Cluster:
