BitBucket, Terraform and Ansible – Flexible CI/CD for Immutable Infrastructure - Part 2
In previous posts we looked at a basic example of creating Immutable Infrastructure via BitBucket Pipelines using Terraform as well as why we would want to use Immutable Infrastructure and what benefits it brings. However we didn’t look at how to extend the pipeline in to Configuration Management. We’re going to look at that now, leveraging Ansible within the pipeline to automatically configure the instances we create immediately after they have been created for true one-touch, immutable deployments.
Sample code for this post can be found here.

Existing Components
This post is going to follow the previous Terraform-only deployment (which I’d recommend reading first). For the most part the Terraform EC2 deployment is identical and still leverages the Hashicorp Vault deployment for provisioning, some other components which we will be relying on extensively are:
- The SSH Key Pair tinfoil-key is still being used to gain access to the EC2 instances, this Key Pair was generated outside of AWS so we have both the public and private keys
- We still have the TF_VAR* variables being injected from the BitBucket pipeline which is being used for the Terraform provisioning.
- One small difference is that we’ll be using Ubuntu 18.04 instead of 16.04 this time, otherwise the terraform main.tf, variables.tf and provider.tf are identical so there’s no need in posting them here again (they are however in the git repo).
Intended Configuration
So let’s take a look at our intended solution at a high level:
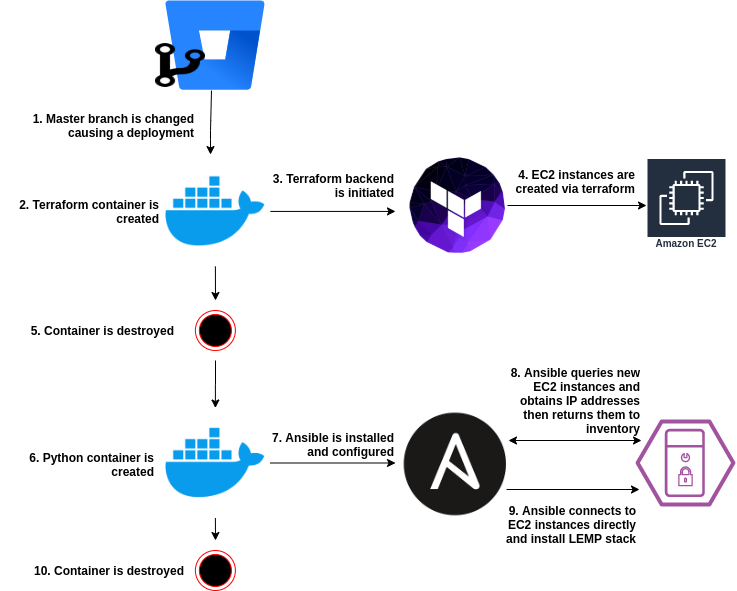
Establishing Pre-Requisites
The abstract is clear enough and we know what we want to achieve, however there’s a few things we’ll need to get in place before we have a functional pipeline, these are:
- Additional Environment Variables for Ansible. Ansible will need to be able to work with both the AWS Secret Key and AWS Access Key, whilst we have already defined these for Terraform, for the sake of clear variable names we’ll define these again for Ansible.
- An SSH Key to gain access to the EC2 Instances. As we know we have already configured the the Key Pair tinfoil-key to authenticate against the instances during provisioning, so we will need to use this same key in our pipeline.
- These values are sensitive and must not be exposed at any point during execution.

Note that they have been marked as secure to ensure that they aren't exposed during execution
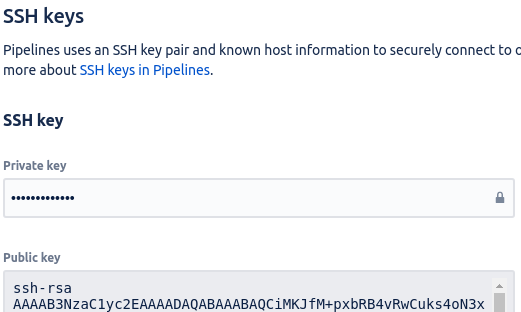
Note that the Private Key is always secured
Ansible - Building The Playbook
Let’s think how we need to connect to our EC2 endpoints using Ansible to perform per-instance configurations…we need to use SSH and to do that we’ll need to at least know the IP address of each instance.
The first issue we encounter is that Terraform has built our instances, but we have no return data from which we can determine that IP addresses as the terraform container has been destroyed, so we’ll be doing all of our work in Ansible, we have 3 main tasks we’ll need our Playbook to do:
- Connect to AWS and return EC2 info in to memory
- From this info, extract the IP addresses and register it in to an Ansible Inventory
- Iterative through this new Inventory and connect to each Instance, performing our configuration tasks
Below is the Playbook we’ll be using named configure-ec2.yml:
---
- name: Lookup EC2 Instance Data
  hosts: localhost
  gather_facts: false
  connection: local
  vars:
    aws:
      access_key: '{{ lookup("env", "ANS_AWS_ACCESS_KEY") }}'
      secret_key: '{{ lookup("env", "ANS_AWS_SECRET_KEY") }}'
      region: 'eu-west-2'
  tasks:
    - name: Gather EC2 Facts
      ec2_instance_info:
        region: "{{ aws.region }}"
        filters:
          instance-state-name: [ "running" ]
        aws_access_key: "{{ aws.access_key }}"
        aws_secret_key: "{{ aws.secret_key }}"
      delegate_to: localhost
      register: ec2_instances

    - name: Determine Public IPs from EC2 Facts
      set_fact:
        ec2_public_ips: "{{ ec2_instances | json_query('instances[*].public_ip_address') }} "

    - name: Add New Instances to Ephemeral Inventory
      add_host:
        name: "{{ item }}"
        groups: ec2_just_created
        ansible_ssh_extra_args: '-o StrictHostKeyChecking=no'
        ansible_user: ubuntu
      with_items: "{{ ec2_public_ips }}"

- name: Configure EC2 Instances
  hosts: ec2_just_created
  connection: ssh
  gather_facts: false
  tasks:
    - name: Update apt Cache
      apt:
        update_cache: yes
        force_apt_get: yes
      become: yes
      become_method: sudo
      become_user: root

    - name: Install LEMP Stack on Instances
      apt:
        name:
        - nginx
        - mariadb-server
        - php-fpm
        force_apt_get: yes
      become: yes
      become_method: sudo
      become_user: root
...
Some critical points to be aware of here:
- Line 3: We define localhost as the host, in the absence of an Ansible Inventory Ansible will use the Implicit localhost and connect to the local container. See the Ansible Docs for a detailed breakdown.
- Line 5: We define the connection as local, meaning Ansible is connecting to its local daemon rather than using SSH.
- Lines 8-9: We are performing and Ansible lookup action to load the Environment Variables for the AWS Access Key and AWS Secret Key.
- Line 16: We are filtering for all Running EC2 instances.
- Lines 17-18: We are passing the looked up Environment Variables to the ec2_instance_info module for authentication. Ansible knows to treat these as secrets so they won’t be exposed in the stdout.
- Line 20: We are registering the results of the ec2_instance_info to a variable called ec2_instances.
- Line 24: We use the Ansible json_query filter to extract all Public IP instances from the ec2_instances variable and register them in a new variable named ec2_public_ips.
- Lines 26-32: We use the add_host module to add the newly obtained IP Addresses to the Ansible Inventory (which only exists for the life of the container) and register them in an Ansible group named ec2_just_created whilst defining the remote username as ubuntu and disabling remote host key checking for SSH.
- Line 35-56: Hosts are being defined as **ec2public_ips**, meaning that this _play will be executed against all remote instances.
- Lines 39-45: The apt cache will be updated on all instances, the become directives allow this task to be executed as root.
- Lines 47-56: The apt-get install command will install the LEMP stack (NGINX, MariaDB and PHP-FPM), again using the become directives to execute as root.
Building the Pipeline
As before, we will define the pipeline in BitBucket within the bitbucket-pipelines.yml, assuming that this file is already present and that pipelines are present we will edit the file to reflect the below:
pipelines:
  branches:
    master:
    - step:
        name: Terraform Configuration
        image: hashicorp/terraform:full
        script:
          - terraform init -backend-config="access_key=$TF_VAR_AWS_ACCESS_KEY" -backend-config="secret_key=$TF_VAR_AWS_SECRET_KEY"
          - terraform validate
          - terraform plan
          - terraform apply -input=false -auto-approve
    - step:
        name: Ansible Configuration
        image: python:2.7.13
        caches:
          - pip
        script:
          - pip install -r requirements.txt
          - ansible-playbook configure-ec2.yml
We are adding a second step to the pipeline and specifying:
- An image of Python 2.7.13 (while this version of python is now end of life, Ansible is still largely Python 2.7 centric)
- A pip cache to allow pip packages to be held in cache
- Two script actions, one to install pre-requisite Python packages and one to execute the Playbook using the ansible-playbook command
Python Packages?
One last thing that we haven’t mentioned yet is that the Python container is totally barren when we initiate it, meaning that it’s void of any packages that we might need, we have a requirement for some key packages in order to execute this Playbook:
- boto: AWS Python Library
- boto3: AWS Python SDK
- botocore: Low level core of boto3 SDK
- ansible: Because…we can’t run ansible without installing it
We need to install all of these packages using the Python package manager (pip), and to make our pipeline a little cleaner we can specify the packages and the minimum versions in a single file named requirements.txt which will be read when we execute pip install -r requirements.txt. The contents of our requirements.txt is:
ansible>=2.9.7
boto>=2.49.0
boto3>=1.13.6
botocore>=1.16.6
Executing the Pipeline
So now that we understand the components and we have committed them, we should see the pipeline run:
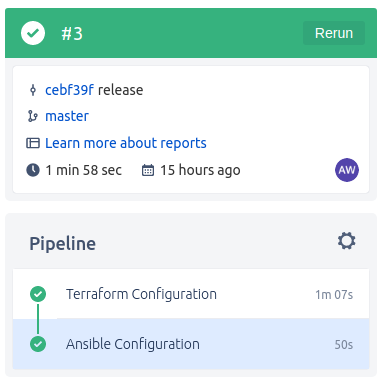
If we drill in to the Ansible Configuration step of the Pipeline, we can see the Playbook tasks in detail:
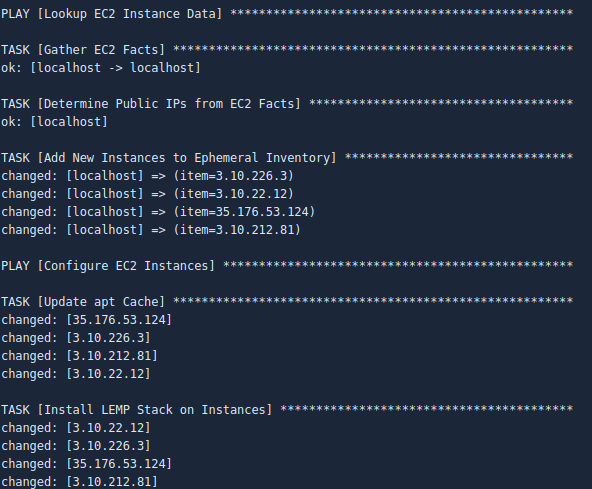
Conclusion
From this simple deployment we have now created a variable amount of EC2 instances and within seconds of their creation, installed a full software stack on them without knowing any of their connection details ahead of time.
We can extend this code as required but for the sake of brevity I haven’t included detailed configuration of the LEMP stack such as deploying the web server and database configurations, however these are trivial tasks from this point and become a few more files and tasks to be added to the playbook and allow for widely scalable services to be deployed to multiple environments from the same deployment pipeline.